
Developing an adapter for IBM Verify Identity Governance
08 August, 2025, by Madison Shaw
In this blog post, I will give an overview of the development and deployment of an adapter for IBM Verify Identity Governance (IVIG) that will allow IVIG to connect with another system. The adapter uses IBM Verify Directory Integrator (ISVDI) to transform and send data between two services. In the example below, an adapter was developed to connet IVIG to Madigan’s own third-party user management system: UMT.
Similarly, you may see ISVDI being referred to by one of its older names. It was formerly known as IBM Security Directory Integrator (ISDI or SDI), and IBM Tivoli Directory Integrator (ITDI or TDI) before that, and IBM Directory Integrator (IDI) way before that.
The old wizards in this space use all of these terms interchangeably. How helpful of them!
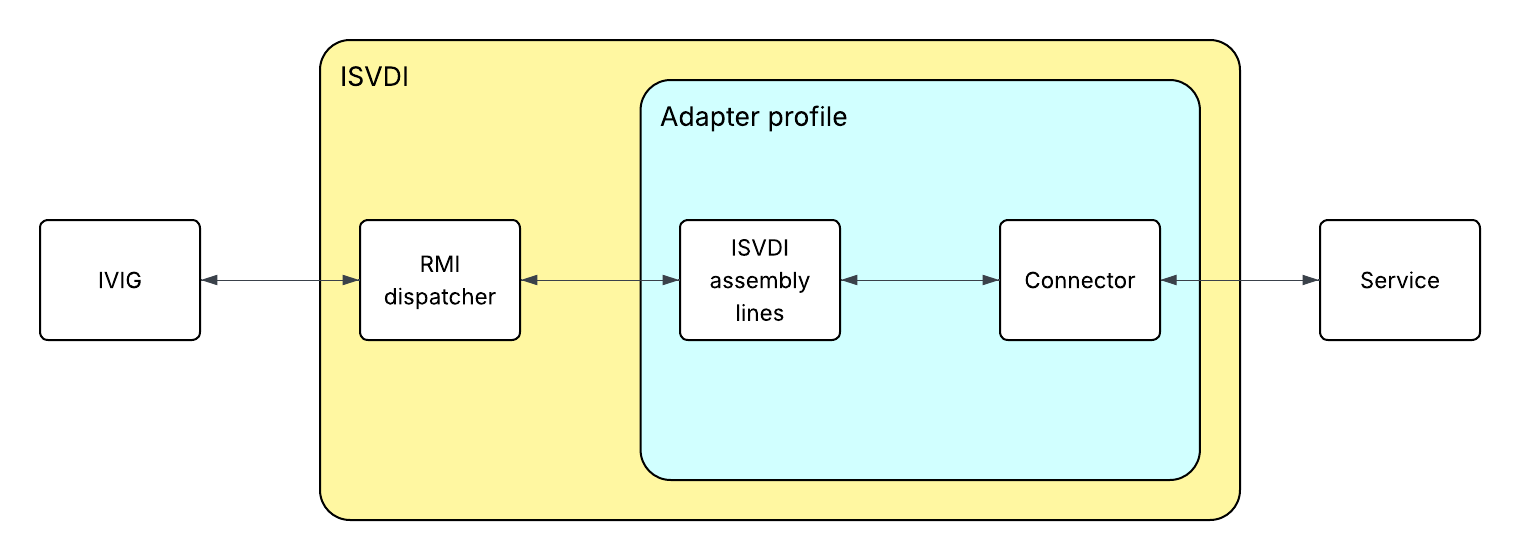
What is an adapter and how does it work?
An adapter provides the information that a service needs to interact with other services. This information is contained within the adapter profile.
When a request is made in the service, IVIG passes the request on to the RMI dispatcher within ISVDI. When the dispatcher receives the request, the adapter profile provides information about the attributes, object classes, and operations available so that the dispatcher can complete the request. The dispatcher triggers the appropriate assembly line, which then performs an operation defined by the connector and sends the result back to IVIG.
An adapter is created in IVIG when an adapter profile is uploaded as a service type.
The adapter profile
The adapter profile defines the components necessary for interacting with a service. The adapter profile includes:
- A schema definition (schema.dsml). This defines the object classes available to the service (like users and groups), as well as the attributes that are available to these object classes.
- Custom forms that will appear in IVIG when managing the service, accounts, and groups.
- Custom labels to be used for the attributes in the custom forms.
- ISVDI assembly lines, exported from ISVDI as .xml files, one for each operation you want to perform. Typically, there will be assembly lines for adding, reconciling, modifying, deleting, and testing the service. These assembly lines make use of a custom connector to perform these operations—more detail on how to develop a custom connector later in this article.
- A service definition (service.def) which, as the name suggests, defines the service by pointing to the other elements mentioned above.
Schema
The schema defines the adapter’s attributes and object classes.
Attributes are defined as such:
<attribute-type single-value="true">
  <name>erUMTusername</name>
  <description>Username</description>
  <object-identifier>erUMTusername-OID</object-identifier>
  <syntax>1.3.6.1.4.1.1466.115.121.1.15</syntax>
</attribute-type>
The object-identifier must be unique.
The syntax attribute defines the format of the attribute in the form of an LDAP OID. In this example, the LDAP OID is 1.3.6.1.4.1.1466.115.121.1.15 which indicates that this attribute is a string. Other syntaxes include 1.3.6.1.4.1.1466.115.121.1.27 for an integer and 1.3.6.1.4.1.1466.115.121.1.7 for a Boolean. A full list of LDAP OIDs can be found here.
Object classes are defined similarly:
<class superior="top">
  <name>erUMTAccount</name>
  <description>Class representing an example account</description>
  <object-identifier>erUMTAccount-OID</object-identifier>
  <attribute ref="eruid" required="true" />
  <attribute ref="erUMTusername" required="true" />
  …
</class>
All of the attributes associated with the object class should be added as attribute elements within the class.
You must define one service class and at least one account class. Our adapter has two account classes, one for users and one for groups.
Custom forms and labels
Generally, an adapter has three different form templates, one for each of the three classes mentioned above: erUMTService.xml, erUMTUser.xml, and erUMTGroup.xml. These forms allow us to edit attributes from the IVIG UI.
The labels that appear on these forms are defined in CustomLabels.properties.
Developing the connector
The operations that IVIG can request from an adapter are:
- SEARCH (access user and group information, used to run a reconciliation)
- ADD (create new users or groups)
- MODIFY (modify attributes, suspend and restore accounts, change passwords)
- DELETE (self-explanatory)
- TEST (send a simple response to ensure the service is connected)
These operations are performed using functions that are defined by a connector. A list of the functions available to a connector can be found here, and an example of a script connector can be found in your ISVDI installation folder at {your_installation_folder}/V10/examples/script_connector. I found this to be of limited use as it reads and writes to a text file rather than interacting with any kind of application, and it doesn’t implement a modify or delete function, but it does provide a starting point to build on.
Within a custom connector, the functions for connecting to the target service are defined. In the UMT connector, each function performed an HTTP request against the UMT API service.
For IVIG and the target application to talk to each other, they have to go through ISVDI. This might involve a bit of mapping; to get our data from UMT to IVIG, we had to:
- Convert the UMT users (who are in JSON format) to something ISVDI can understand (an entry)
- Use the input/output map to take these entry attributes and turn them into IVIG attributes
I created two helper functions to convert the user data from JSON to ISVDI entry object and vice versa.
Once the connector has been developed, it can be used by the assembly lines in the adapter. As mentioned previously, we need one assembly line per operation because each operation uses a different assembly line mode:
- SEARCH: Iterator
- ADD: AddOnly
- MODIFY: Update
- TEST: CallReply
- DELETE: Delete
In each assembly line, the custom connector is added to the feed or data flow (depending on the operation) and the attributes are mapped in the input or output map.
Once the assembly lines are finished, you can export them as XML files and put them into the adapter profile folder along with the service definition, the custom forms and attributes, and the schema. The adapter profile can then be converted to JAR format (make sure to do this with the profile folder itself rather than the individual files) and uploaded to IVIG.
Uploading the adapter profile to IVIG
The resulting JAR file can now be uploaded as a service type in IVIG. If the upload is successful, the service type should be available immediately; unfortunately, if the upload is unsuccessful, rather than displaying some sort of error, the attempted upload just sits in a “Pending state” forever, and each failed upload creates a new pending service type. The process to remove these failed uploads is detailed in the “Trip hazards” section of this article.
If the profile upload is successful, its status will become “Available”, and you’ll be able to select the service type to see its properties. The attributes and object classes defined by the adapter will be made available in IVIG’s underlying LDAP server.
If for any reason you need to update your adapter, you’ll need to re-jar the profile with your changes. You’ll also need to restart your ISVDI service.
Once the service type is uploaded, a service can be created with this type. Be aware that the value of the Security Directory Integrator location attribute may be prepopulated as rmi://localhost:1099/ISVDIDispatcher - this has to be changed to rmi://isvdi:1099/SDIDispatcher for the service to work in a containerised world.
Populate the service form with the relevant details, test the connectivity to the backend system, then run a reconciliation of the service.
Trip hazards
There are a few things to be aware of during the development and deployment of an adapter:
- Consistency: when it comes to attribute names, IVIG is case-sensitive. For UMT’s attributes, I used a naming convention of erUMTattributename, while some other adapters I referenced used camel case. Whichever you choose, make sure you are consistent because IVIG might have trouble matching things up if they don’t match exactly.
- ISVDI location: ensure that you’re pointing to the correct ISVDI location when creating the service type in a containerised deployment.
- Restart the ISVDI service after updating the adapter: IVIG will cache the previous adapter upload, so if you don’t restart the ISVDI service your changes may not come into effect.
- Forever pending uploads: multiple failed adapter uploads will clutter up the service types table. You can clean them up in postgres:
- Log in as admin: psql ivig admin
- View the failed imports: select * from import_status
- Remove them: delete from import_status
- Ensure that you JAR the profile folder itself rather than the individual files inside the folder.
Conclusion
Developing and deploying an adapter is an essential skill for anyone working with the IBM Verify stack. Adapters help to integrate identity management systems so that an organisation has full visibility and administration of all its identities.
To learn more about identity management integration, check out our other blog posts orcontact us today.